
Bunting, knitting and the big move to Melbourne!
Mercifully, on this blog, you have not been subjected to the trials and tribulations of my working life since the company I work for was sold last year, but put it this way, my T-Zero app tells me I have 1 year, 91 days, 10 hours, 51 minutes and 24 seconds until I can resign...
A couple of weeks ago, after months of longing for something to change for the better, I found out my proposal to relocate to Melbourne had been accepted and I can move down to our smaller sister office and escape the worst of the takeover fallout. I am so excited about this!
Right now it has me a bit flappy-armed, flitting around the house trying to figure out what to pack, what to leave, whether to rent the place out, sell it, and how on earth I managed to accumulate so much stuff! It also has me dividing my time between cities until I can find a place to live in Melbourne and pack all my stuff in Sydney.
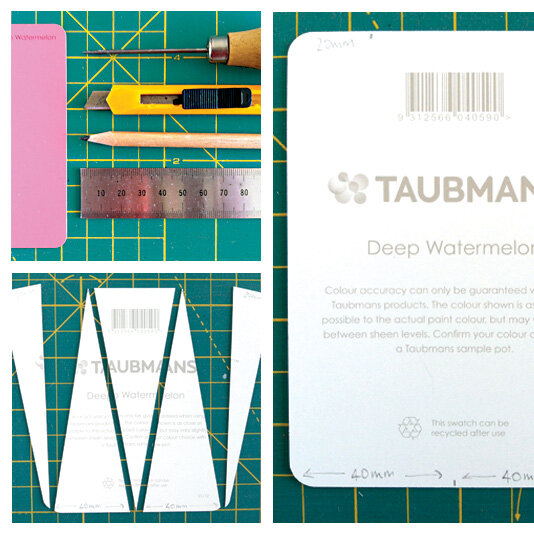
Sadly this has left the blog a bit neglected over the last few weeks. I am still working on my April finish – and determined to post a successful completion on here by the end of the month, but the other project I've been trying to finish is some paint-swatch bunting. I have a space above my desk that needed some brightening up so I collected half a dozen or so paint swatches every time I happened to be in a hardware store to make the bunting. I cut each of the swatches into three long triangles by measuring the half way point on one short edge, then halving that distance and marking it in from each edge on the opposite side (as below). I then used a steel ruler and a blade to cut the shapes on my patchwork matt.
To punch the holes I used a nifty little tool I bought a while back when I was doing one of my sister's wedding invitations, and then threaded the pieces onto long cord. I'd already measured out the shape I wanted to make on the wall and bought the correct length. I started by threading the cord through the front on the left hand side, pulling the cord all the way through and then threading from back to front on the right hand side. When I wanted to change the direction of the bunting I left a longer piece of cord between two triangles and threaded the other way. So, front to back on the right hand side, and then back to front on the left hand side.
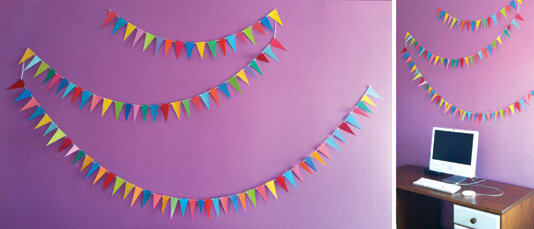 To attach it to the wall I just used blu-tak at the end of each drop and let the bunting hang freely in between. I love the happy bunting now above my workspace!

A couple of weeks ago, after months of longing for something to change for the better, I found out my proposal to relocate to Melbourne had been accepted and I can move down to our smaller sister office and escape the worst of the takeover fallout. I am so excited about this!
Right now it has me a bit flappy-armed, flitting around the house trying to figure out what to pack, what to leave, whether to rent the place out, sell it, and how on earth I managed to accumulate so much stuff! It also has me dividing my time between cities until I can find a place to live in Melbourne and pack all my stuff in Sydney.
Sadly this has left the blog a bit neglected over the last few weeks. I am still working on my April finish – and determined to post a successful completion on here by the end of the month, but the other project I've been trying to finish is some paint-swatch bunting. I have a space above my desk that needed some brightening up so I collected half a dozen or so paint swatches every time I happened to be in a hardware store to make the bunting. I cut each of the swatches into three long triangles by measuring the half way point on one short edge, then halving that distance and marking it in from each edge on the opposite side (as below). I then used a steel ruler and a blade to cut the shapes on my patchwork matt.
To punch the holes I used a nifty little tool I bought a while back when I was doing one of my sister's wedding invitations, and then threaded the pieces onto long cord. I'd already measured out the shape I wanted to make on the wall and bought the correct length. I started by threading the cord through the front on the left hand side, pulling the cord all the way through and then threading from back to front on the right hand side. When I wanted to change the direction of the bunting I left a longer piece of cord between two triangles and threaded the other way. So, front to back on the right hand side, and then back to front on the left hand side.