
Finding your bag at big school
My niece, Miss Olivia, started school today. Mum, Dad, sisters and Grandpa were all there to see her off. She had butterflies walking down the hall to class, but it was OK because she was excited too. By the time I saw her, she was so hyped up I couldn't really get a word out of her about how the day had gone, but apparently it was good. Sighs of relief all round since starting preschool had been a bit more traumatic!
Last week Kate (Olivia's mum) rang to ask if I had any old keyrings to put on Olivia's bag so she could tell which was hers – apparently they all have to get the same maroon schoolbag. I'd actually just thrown an old one out, so offered to make a couple instead – one for the main schoolbag, and one for the library bag.
The inspiration for these came from Crochetka via Pinterest. I love her brooches, so I decided to try and make one as a bag tag – they could just as easily be made into Christmas ornaments too! The materials were simple – four different felt colours, a large button, two embroidery threads, a small piece of ribbon and a large split ring.
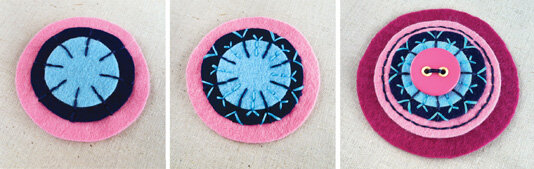
 I cut the smallest circle with a 5cm diameter, the next at 7cm, then 9cm and the two largest at 11.5cm. The stitching is almost entirely back stitch. As you can see below, I stitched the three smallest circles together with the first two rounds of stitching, then one of the largest squares was attached to the back with a round of back stitch and the button.
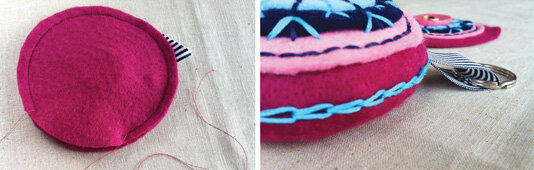
 Next, I cut the ribbon to length and threaded it through the split ring. I lay that on top of the button, and placed the final large felt circle on top. I made sure there was some ribbon hanging out so it would get caught in the seam. I then sewed round the ornament on the machine with about a quarter-inch seam, and leaving (approximately) a 2-inch gap at the bottom of the ornament. I made sure I left a long tail of thread, so that when I turned the ornament inside out (so the decoration is now on the outside), and had stuffed it with cushion filler, there was enough thread to hand-stitch the opening closed.
To neaten up the finished edge I used the light blue thread to stitch a chain stitch around the ornament.
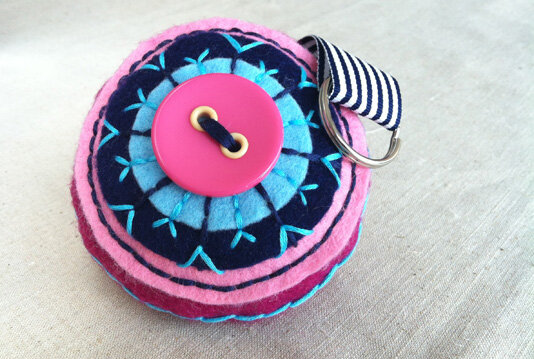
 And here's the finished product... It remains to be seen if it helps with bag identification!
Last week Kate (Olivia's mum) rang to ask if I had any old keyrings to put on Olivia's bag so she could tell which was hers – apparently they all have to get the same maroon schoolbag. I'd actually just thrown an old one out, so offered to make a couple instead – one for the main schoolbag, and one for the library bag.
The inspiration for these came from Crochetka via Pinterest. I love her brooches, so I decided to try and make one as a bag tag – they could just as easily be made into Christmas ornaments too! The materials were simple – four different felt colours, a large button, two embroidery threads, a small piece of ribbon and a large split ring.
To neaten up the finished edge I used the light blue thread to stitch a chain stitch around the ornament.